
Objectives
By the end of this guide, you will be able to
- generate private keys and certificates using strongswan pki
- configure firewall with ufw
- enable kernel IP Forwarding
- set up a VPN tunnel
Prerequisites
- StrongSwan
sudo apt install strongswan strongswan-pki
Step 1: Generating keys and certificates
i) Before getting started, switch to root user
sudo su
ii) Generate the private key for the CA
ipsec pki --gen --size 4096 --type rsa --outform pem > /etc/ipsec.d/private/ca.key.pem
iii) Generate the CA certificate and sign it with the above key
ipsec pki --self --in /etc/ipsec.d/private/ca.key.pem --type rsa --dn "CN=My VPN Server CA" --ca --lifetime 3650 --outform pem > /etc/ipsec.d/cacerts/ca.cert.pem
You can change the Common Name (CN) value to anything you like.
iv) Generate the private key for the VPN server
ipsec pki --gen --size 4096 --type rsa --outform pem > /etc/ipsec.d/private/server.key.pem
v) Generate the VPN server's certificate
ipsec pki --pub --in /etc/ipsec.d/private/server.key.pem --type rsa | ipsec pki --issue --lifetime 2750 --cacert /etc/ipsec.d/cacerts/ca.cert.pem --cakey /etc/ipsec.d/private/ca.key.pem --dn "CN=192.168.100.136" --san="192.168.100.136" --flag serverAuth --flag ikeIntermediate --outform pem > /etc/ipsec.d/certs/server.cert.pem
Here the CN and the Subject Alternate Name (SAN) values should match the server's IP address or DNS name. To find the IP address of your device, run ifconfig
Step 2: Configuring StrongSwan
i) Open the configuration file
nano /etc/ipsec.conf
ii) Add the following lines to your configuration file to make it look similar to this.
config setup
Note that the leftid should correspond to the IP address or DNS name of the server (The CN value used to generate the VPN server's certificate).
Step 3: Configuring VPN Authentication
i) Open /etc/ipsec.secrets
nano /etc/ipsec.secrets
ii) Add credentials
# This file holds shared secrets or RSA private keys for authentication.

# RSA private key for this host, authenticating it to any other host
# which knows the public part.

: RSA "server.key.pem"
username : EAP "password"
keelan : EAP "qwerty"
iii) Restart the VPN service to apply our latest configuration
systemctl restart strongswan-starter
Step 4: Configuring Firewall
i) Allow all incoming SSH connections
ufw allow OpenSSH
ii) Enable the firewall
ufw enable
iii) Allow UDP traffic to the default IPSec ports, 500 and 4500
ufw allow 500,4500/udp
iv) Find the network interface used on our server to access the internet
ip route show default

In this case, the interface is wlp1s0.
v) Configure the Network Address Translation (NAT)
- Open the before.rules file
- Add the following lines before the *filter line
*nat
-A POSTROUTING -s 10.10.10.0/24 -o wlp1s0 -m policy --pol ipsec --dir out -j ACCEPT
-A POSTROUTING -s 10.10.10.0/24 -o wlp1s0 -j MASQUERADE
COMMIT

*mangle
-A FORWARD --match policy --pol ipsec --dir in -s 10.10.10.0/24 -o wlp1s0 -p tcp -m tcp --tcp-flags SYN,RST SYN -m tcpmss --mss 1361:1536 -j TCPMSS --set-mss 1360
COMMIT
Replace wlp1s0 with the name of your interface.
- Add the following lines after the *filter line
-A ufw-before-forward --match policy --pol ipsec --dir in --proto esp -s 10.10.10.0/24 -j ACCEPT
-A ufw-before-forward --match policy --pol ipsec --dir out --proto esp -d 10.10.10.0/24 -j ACCEPT
vi) Reset firewall
Step 5: Configuring Kernel IP Forwarding
i) Open /etc/sysctl.conf
nano /etc/sysctl.conf
ii) Uncomment the following lines to enable packet forwarding
net.ipv4.ip_forward=1
ii) Run sysctl -p
Step 6: Connecting to the VPN server
From IOS
i) Email yourself the CA certificate
ii) Tap on the certificate to download it
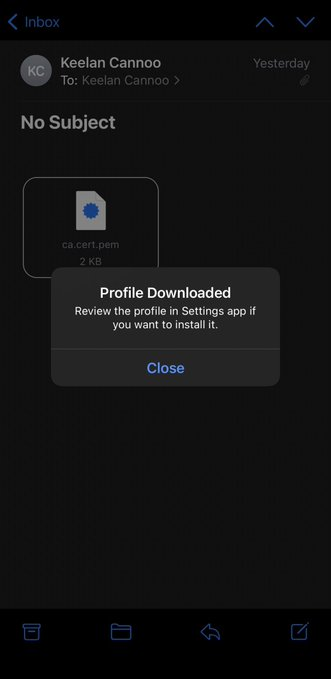
iii) Go to Settings> Profile Downloaded and install your CA certificate
iv) Add VPN configuration and fill in the appropriate information

v) Connect to the VPN

vi) On the VPN server, run sudo ipsec status

Comments
Post a Comment